
 (+86)-137 5851 1881
(+86)-137 5851 1881
(+86)-137 5851 1881


Content
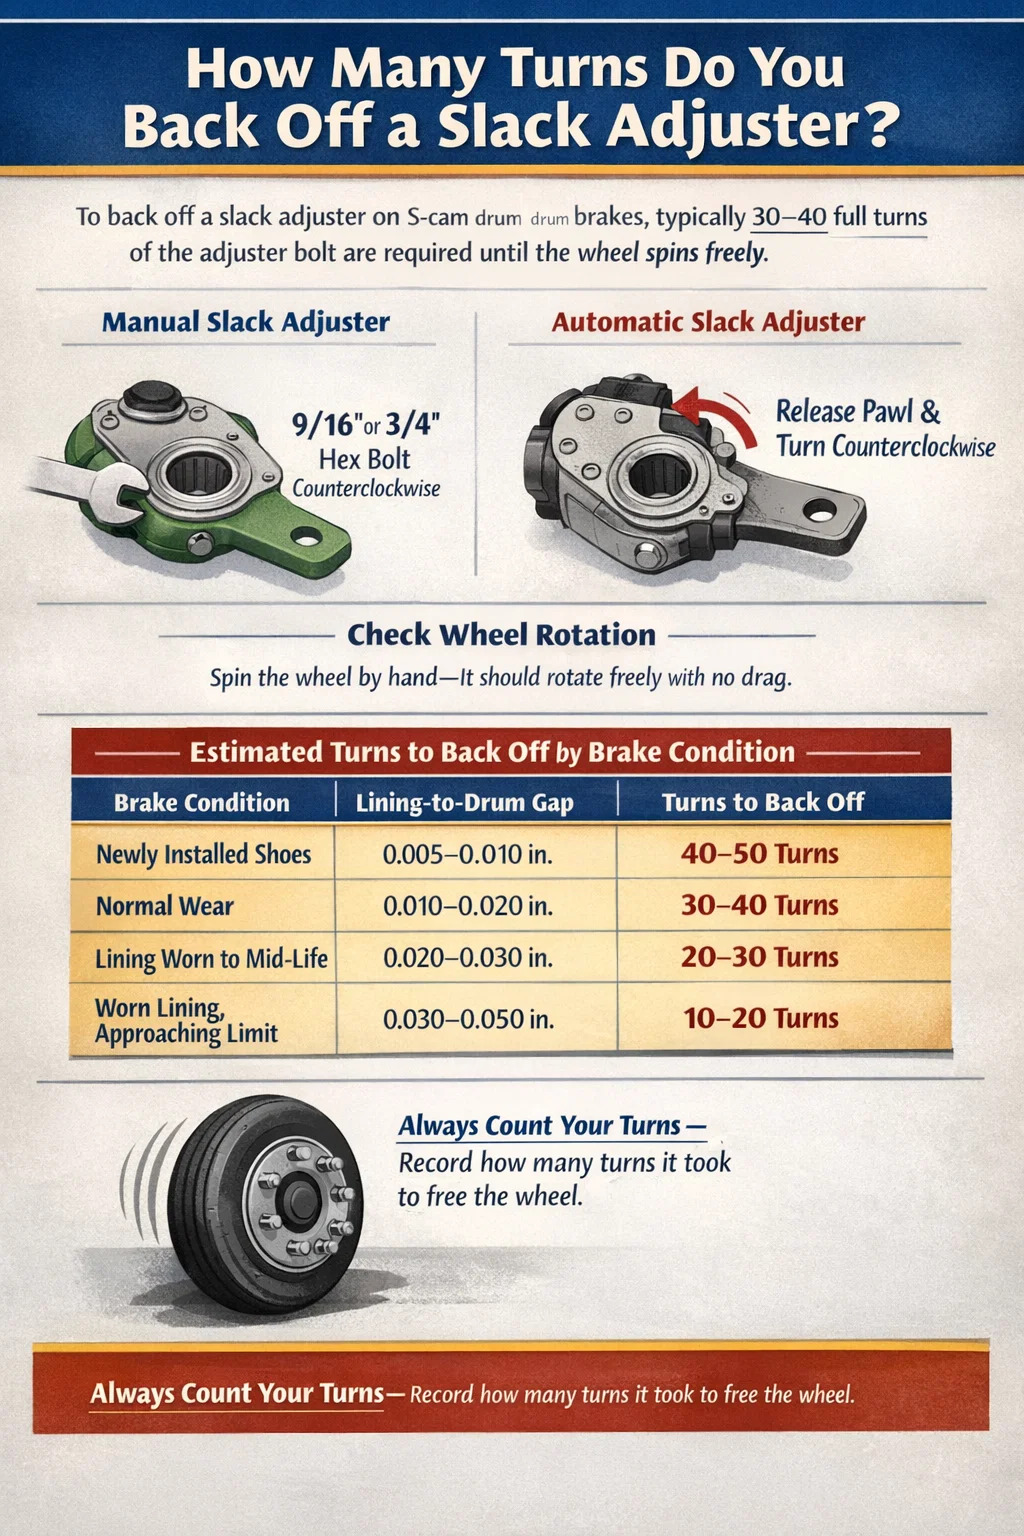
The standard procedure for backing off a slack adjuster is approximately 30 to 40 full turns of the manual adjuster bolt — or until the brake shoes fully retract from the drum and the wheel rotates freely without drag. For automatic slack adjusters (ASAs), the release process differs slightly: you disengage the pawl mechanism and manually back the adjuster off until the pushrod travel is within spec or the brakes are clear of the drum. The exact number of turns varies depending on the make, model, and current brake adjustment state, but 30–40 turns is a reliable baseline for most S-cam drum brake systems.
This matters most when you need to remove brake drums, replace brake shoes, or perform axle work that requires the wheel to spin freely. Rushing this step — or not knowing the correct number of turns — leads to scored drums, torn lining, or an incomplete brake job. Below is a full breakdown of the process, common mistakes, and system-specific variations.
A slack adjuster is a mechanical lever arm that converts the linear force from an air brake chamber pushrod into rotational torque applied to the camshaft. On S-cam drum brake systems — the most common configuration on Class 7 and Class 8 trucks, trailers, and buses — the slack adjuster sits between the air chamber and the S-cam shaft. Its job is to maintain a consistent mechanical advantage as brake lining wears down over time.
As lining wears, the gap between the lining and the drum grows. The adjuster compensates by rotating the S-cam slightly, keeping pushrod stroke within the legal limit of no more than 2 inches (50.8 mm) for standard long-stroke chambers, or no more than 1.75 inches for standard stroke chambers. When you're doing brake work and need to slide a drum off or install new shoes, the lining needs to be pulled away from the drum surface. That's when backing off the adjuster becomes essential.
Understanding which type you're working with changes the back-off procedure significantly:
Failing to release the pawl on an automatic adjuster before turning can damage the internal ratchet mechanism, causing the adjuster to malfunction and allow pushrod stroke to grow out of spec — a serious safety and compliance issue.
The process below applies to standard S-cam drum brake configurations found on most North American heavy-duty trucks and trailers. Always chock wheels and cage the spring brake before performing any brake work.
In practice, most technicians report 25 to 40 turns for a well-adjusted brake in normal condition. A brake that was already borderline out of adjustment — with worn lining or excessive clearance — may only need 10 to 15 turns. A freshly replaced set of shoes with maximum lining thickness might require 45 or more turns to fully retract.
The number of turns needed to back off a slack adjuster is directly related to how far the lining currently sits from the drum. The table below provides practical estimates based on lining condition:
| Brake Condition | Approximate Lining-to-Drum Gap | Estimated Turns to Back Off |
|---|---|---|
| Newly installed shoes (full thickness) | 0.005–0.010 in. (properly set) | 40–50 turns |
| Normal wear, properly adjusted | 0.010–0.020 in. | 30–40 turns |
| Lining worn to mid-life | 0.020–0.030 in. | 20–30 turns |
| Worn lining, approaching limit | 0.030–0.050 in. | 10–20 turns |
| Out-of-adjustment brake (excessive stroke) | 0.050+ in. | 5–15 turns |
These figures assume a standard S-cam system with a thread pitch that produces roughly 0.025 inches of lining movement per full revolution of the adjuster bolt. Haldex, Gunite, and Meritor adjusters are all within this range, though minor differences exist between product lines.
While the general procedure is consistent across systems, specific slack adjuster brands have slightly different release mechanisms and wrench sizes. Knowing your brand saves time and prevents accidental damage to the adjuster internals.
Haldex is one of the most common automatic slack adjuster brands in North America. Their adjusters typically use a 3/4" hex bolt and include a pull-type release collar. To back off a Haldex adjuster, pull the collar outward (away from the adjuster body) and hold it while turning counterclockwise. The collar must remain pulled throughout the entire back-off sequence — releasing it mid-turn can engage the internal clutch and lock the adjuster mid-position. Most technicians use a clip or wire to hold the collar in the released position when working alone.
Meritor adjusters are common on Peterbilt, Kenworth, and International trucks. The release mechanism uses a push-type button on the side of the adjuster housing. Depress the button and turn counterclockwise with a 9/16" wrench. Some older Meritor designs allow you to press the button and have it stay depressed without holding it, making solo operation easier. Always verify your specific part number against Meritor's service documentation — their product line includes over a dozen variants with slightly different specs.
Gunite adjusters, commonly found on older trailers and transit buses, use a 5/8" hex bolt in many applications. The release mechanism is similar to Haldex — a pull collar that must be held during adjustment. Gunite adjusters tend to have a slightly stiffer feel when turning, especially on adjusters that haven't been serviced recently. If you encounter significant resistance, apply penetrating oil to the worm gear housing before forcing the bolt — excessive torque on a seized adjuster can strip the internal worm gear.
Vehicles manufactured before the mid-1990s, certain specialty trailers, and some military equipment still use manual slack adjusters. These have no release mechanism — you simply insert a wrench and turn counterclockwise. The absence of a clutch system means you can accidentally over-tighten or over-loosen during back-off if you're not counting turns carefully. Always count turns from the start so you have a reference point when readjusting after brake work.
Even experienced technicians make mistakes on slack adjusters, especially when working under time pressure or switching between vehicle types. These are the most frequently seen errors:
Backing off a slack adjuster is only half the job. Once you've replaced shoes, machined or replaced the drum, and reinstalled all components, the adjuster needs to be set correctly before the vehicle returns to service. Here's how to do it properly:
If an automatic slack adjuster repeatedly fails to self-adjust to within spec after multiple brake applications, the adjuster itself is likely worn or malfunctioning and should be replaced rather than compensated for through manual adjustment. FMCSA regulations prohibit manually maintaining an automatic adjuster — if it won't hold adjustment on its own, replacement is the only compliant fix.
Any time you're backing off a slack adjuster for brake work, take a few extra minutes to inspect the adjuster itself. Catching a worn or damaged adjuster during a scheduled brake job is far better than dealing with an unexpected failure on the road.
Grab the adjuster arm and attempt to move it laterally (side to side along the S-cam axis). Any play here indicates worn clevis pin bushings. Acceptable lateral play is less than 1/8 inch (3.2 mm). Anything more and the adjuster arm should be replaced. Worn bushings reduce mechanical efficiency and allow the effective lever arm length to shift, causing inconsistent pushrod stroke across brake applications.
If the adjuster bolt turned with extreme difficulty during back-off, the internal worm gear may be corroded or dry. After cleaning and inspecting, apply high-temperature grease to the worm gear assembly if the design allows access. Meritor and Haldex publish relubrication intervals — typically every 100,000 miles or annual inspection, whichever comes first. Neglected adjusters seize, fail to self-adjust, and eventually allow stroke to grow until the vehicle goes out of service.
The effective length of the slack adjuster arm — measured from the center of the S-cam shaft to the center of the clevis pin hole — must match the chamber stroke rating. Common arm lengths are 5.5 inches, 6 inches, and 6.5 inches. Using a 5.5-inch arm where a 6-inch arm is required reduces torque output by roughly 8%, leading to inadequate brake force even when stroke appears correct. Always verify arm length against the vehicle's brake specification sheet.
With the adjuster set and drum reinstalled, apply and fully release the brakes 10 times. Then measure stroke again. On a properly functioning automatic slack adjuster, stroke should be within 1/4 inch of where it was after your initial manual setting. If it drifts significantly — either tightening into a drag or loosening beyond the stroke limit — the adjuster is not functioning correctly and must be replaced before the vehicle returns to service.
Most of the procedures above apply to S-cam drum brakes, which represent the overwhelming majority of heavy-duty brake systems in North America. However, some vehicles — particularly older transit buses, certain specialty trailers, and European-spec trucks — use wedge drum brakes or air disc brakes, where the back-off procedure differs.
Wedge brakes use a tapered wedge pushed between two brake actuator rollers to spread the shoes outward. The slack adjuster on a wedge brake is typically an automatic single- or double-anchor pin design. To back off, you loosen an external adjustment nut rather than turning a worm gear bolt. Refer to the vehicle OEM service manual — the procedure varies enough between manufacturers that a generic approach can damage the system.
Air disc brakes, increasingly common on steer axles and some drive axles on newer trucks, do not use a traditional slack adjuster arm. Instead, they use an integrated adjuster mechanism within the brake caliper body. To retract the pads for rotor removal, you wind back the adjuster spindles using a special cube socket tool — typically a 5mm or 7mm square drive inserted into the piston face. The number of turns required is significantly lower — usually 10 to 20 full rotations per piston — because the running clearance on disc brakes is much tighter (typically 0.002 to 0.005 inches versus 0.010 to 0.020 inches on drum brakes).
Federal law and Commercial Vehicle Safety Alliance (CVSA) out-of-service criteria set clear limits on brake adjustment. Technicians performing brake work need to understand these thresholds because any vehicle returned to service outside these limits creates liability for the shop and the carrier.
Understanding these regulations underscores why correct re-adjustment after backing off is not optional. A brake job that leaves a vehicle with out-of-spec stroke — even if the shoes are brand new — is an incomplete and non-compliant brake job.
No. Turning the worm gear bolt on an automatic adjuster without disengaging the internal clutch will damage the ratchet teeth. Some adjusters will simply not turn; others will turn but destroy the internal mechanism silently, leaving you with an adjuster that appears to function but no longer self-adjusts. Always release the pawl first.
The wheel should spin freely by hand with no audible or tactile drag from the lining contacting the drum. For S-cam drum brakes, you can also insert a feeler gauge through the inspection hole (if present) to verify a minimum clearance of 0.010 to 0.020 inches between lining and drum.
Seized worm gears are common on high-mileage or poorly maintained adjusters. Apply penetrating lubricant, wait 15–20 minutes, and try again. If the bolt still won't turn, do not use a breaker bar or impact driver — excessive force will strip the hex or break the worm gear. At this point, the adjuster needs to be replaced. Attempting to force a seized adjuster through destructive means risks damaging the S-cam shaft or bracket mounting as well.
Not recommended. The internal worm gear in automatic adjusters is designed for hand-torque operation. Impact tools generate instantaneous torque spikes that can crack or strip the worm gear even when the adjuster releases properly. Use a ratchet or combination wrench. The extra few minutes it takes is far cheaper than replacing a damaged adjuster.
Yes, if the new drum has a different inside diameter than the original. A drum machined or replaced with a new one at standard diameter will likely require fewer back-off turns to retract the existing shoes, but the final adjustment target remains the same: stroke within 1.25–1.75 inches at 90 psi application. Always verify stroke after any drum change, even if shoes weren't touched.


 English
 中文简体
中文简体 русский
 عربى
عربى